
Portable Camp Kitchen Setup That Works Anywhere
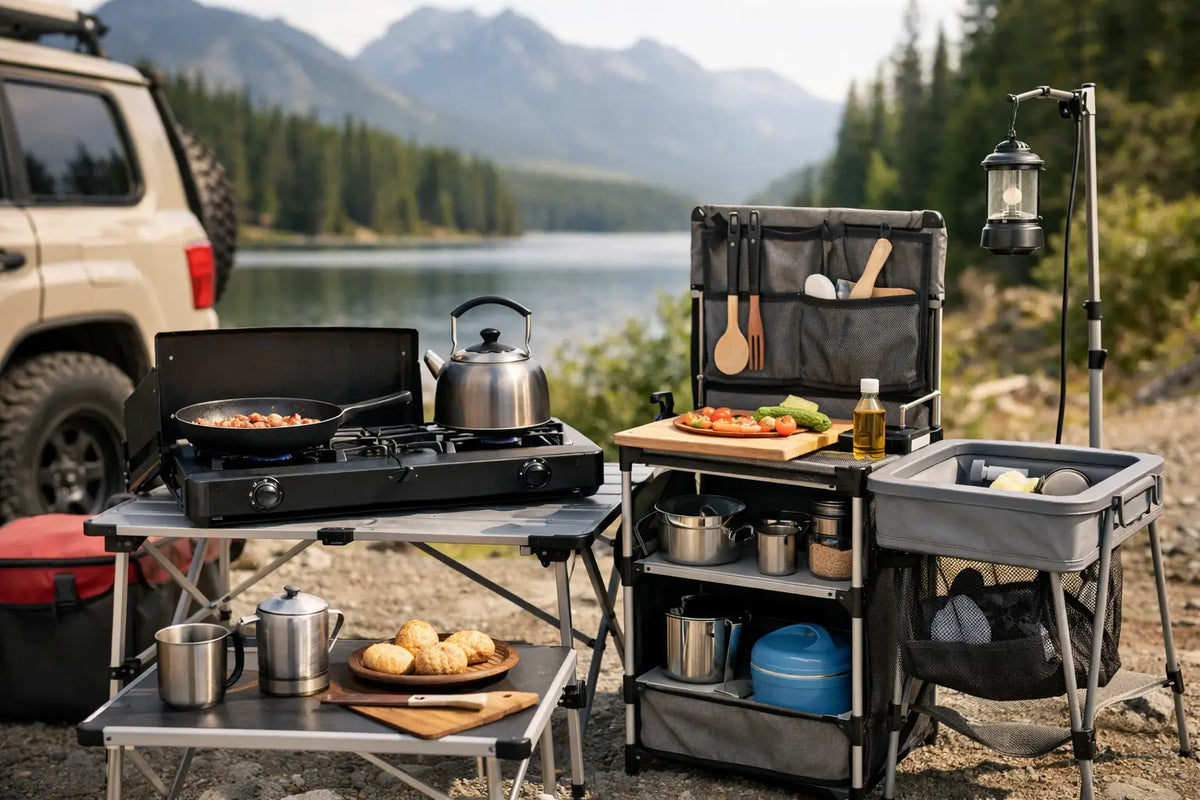
A good meal at camp rarely comes down to a complicated recipe. It comes down to being able to find the knife, light the stove, rinse your hands, and keep food cold without turning the picnic table into a pile of loose gear. A portable camp kitchen setup gives you that working order, whether you are car camping with family, cooking after a paddle, or setting up a simple overnight site.
The best setup is not always the biggest one. It is the one that fits your vehicle, group size, menu, and camp style while keeping hot equipment, raw food, clean dishes, and everyday tools in sensible places. Start with the meals you actually plan to cook, then build around the gear those meals require.
Start With Your Camp Cooking Needs
Before buying bins, tables, and accessories, consider where and how you camp. A weekend at a developed campground supports a larger folding table, full-size cooler, and two-burner stove. A roadside fishing trip may call for a compact stove, one cook pot, and a small water container. If you are carrying gear from a parking area to a lakeside site, every added item needs to earn its space.
Your group size matters just as much. One or two campers can manage with a single burner and a compact prep surface. For four or more people, a two-burner stove and dedicated food storage prevent long waits and crowded work areas. Plan for the meals that create the most work, usually breakfast and dinner, rather than packing for an idealized camp menu you will not want to make after a long hike or day on the water.
Fuel choice is another practical decision. Propane stoves are easy to operate and offer reliable heat control for campground cooking. Butane canisters work well for compatible compact stoves in mild conditions. Wood-fired cooking has its place, but it depends on local fire rules, dry fuel, and your willingness to manage smoke, ash, and cleanup. Always check restrictions before planning meals around a fire ring.
Build a Portable Camp Kitchen Setup by Zones
A kitchen works better when each task has a home. Instead of treating every item as separate gear, organize your portable camp kitchen setup into four simple zones: cooking, prep, cleaning, and storage. The layout can change from a folding table to a tailgate or picnic table, but the zones should stay consistent.
The cooking zone
Place your camp stove on a stable, level surface with open space around it. Keep fuel canisters, paper towels, food packaging, and spare utensils away from the heat. A windscreen can help in breezy conditions, but only use one if it is designed for your specific stove. Improvised windscreens can trap heat around fuel components.
Bring cookware that matches your stove and menu. A skillet, medium pot with lid, kettle, tongs, spatula, and heat-safe gloves cover most campground meals. If your family relies on coffee to get moving, give the coffee maker, kettle, mugs, and grounds their own small tote so morning essentials are not buried under dinner supplies.
Lighting belongs in this zone, too. A headlamp is useful for hands-free cooking, while a lantern or rechargeable camp light brightens the broader prep area. Position lights high enough to illuminate the food, not directly in your eyes.
The prep zone
Set up a clear surface for cutting, assembling, and serving food. A folding camp table is useful when the campground picnic table is wet, uneven, or needed for eating. For short trips, a large cutting board on a clean table may be enough.
Keep your knife, cutting board, bowl, seasonings, and trash bag close together. Store knives in a sheath, roll, or designated utensil case rather than loose in a bin. Separate raw meat from ready-to-eat food, and use different cutting boards when your menu makes that necessary. It takes little extra effort and makes a crowded outdoor kitchen much easier to manage.
The cleaning zone
Camp cleanup gets easier when water is planned from the start. Bring a dedicated water container with a spigot or a collapsible container that can be refilled at an approved source. You need water for drinking, cooking, hand washing, and dishes, so do not count on a nearby faucet unless you have confirmed it is available.
A simple wash system uses two basins: one for washing and one for rinsing. Add biodegradable soap, a scrubber, quick-dry towels, and hand sanitizer. Dispose of dishwater according to campground rules. Never dump greasy water near your tent, shoreline, or campsite, even if the soap label says biodegradable.
The storage zone
Use separate containers for dry food, cooking gear, and cleanup supplies. Clear or labeled bins save time, especially when multiple people are helping. A cooler should hold perishable food and ice, while a food tote holds shelf-stable groceries, snacks, and spices.
At night, follow the site’s food-storage requirements. In bear country, that may mean a bear-resistant container, locker, or properly installed food storage system. In every location, keep food, trash, scented wipes, and cooking residue out of your tent.
Choose Gear That Packs and Performs Well
Portability is more than low weight. A useful camp kitchen also needs to pack efficiently, survive travel, and set up without a long search for missing parts. Folding tables, nesting cookware, collapsible wash basins, and stackable storage bins reduce the amount of unused air you carry in the vehicle.
A larger setup can be worth it when you camp frequently with family or friends. A sturdy table at standing height reduces back strain during meal prep, and a two-burner stove lets you cook eggs while heating water or warming tortillas. The trade-off is vehicle space and setup time. For solo trips, a compact stove and one-pot meal system may be the smarter choice, even if it offers fewer cooking options.
Power can also improve your kitchen, especially on longer stays. A power station can recharge a phone, run low-draw lighting, or support compatible small appliances, but it should not become a substitute for a practical cooking plan. Check wattage requirements before bringing electric gear, and protect all power equipment from rain, spills, and extreme heat.
Pack in the Order You Use Things
A kitchen bin is only helpful when its contents remain organized after a bumpy drive. Pack the items you need first at the top: stove, fuel, lighter or igniter, headlamp, utensils, and hand sanitizer. Put less frequent items, such as extra cookware and refill supplies, lower in the bin.
For a dependable baseline, keep these five categories ready to go:
- Stove, compatible fuel, lighter, cookware, and cooking utensils
- Folding table or clean prep surface, cutting board, and camp knife
- Cooler, dry-food tote, water container, and reusable bottles
- Wash basins, soap, scrubber, towels, sanitizer, and trash bags
- Lantern or headlamps, batteries or charging cable, and a basic first-aid kit
Set Up for Safety and Easy Movement
At camp, set up the kitchen before opening every bag. Choose level ground or a sturdy picnic table, then place the stove where kids, pets, and passing campers will not bump it. Keep the cooler in shade when possible, and avoid placing it next to the stove or in direct afternoon sun.
Create a clear walking path between the kitchen, tent, and vehicle. It sounds minor until someone carries a pot of boiling water through a maze of chairs and tackle boxes. Put a trash bag where everyone can reach it, and keep a small towel nearby for spills. If rain is likely, a shelter or canopy can protect the work area, but maintain ventilation and never operate fuel-burning stoves inside an enclosed tent or shelter.
A quick end-of-meal reset makes the next meal easier. Wipe down the cooking surface, wash and dry cookware, seal food, secure trash, and return tools to their assigned bin. Ten minutes of cleanup can prevent critters, odors, and a frustrating breakfast.
Keep the System Flexible
Your camp kitchen should adjust to the trip, not force every trip into the same loadout. Bring the full table-and-stove arrangement for a long campground stay, then scale back to a compact cook kit for a one-night fishing trip. Add a griddle when feeding a larger group, or skip it when storage space is tight.
The goal is simple: build a setup that lets you spend less time hunting for gear and more time enjoying the campsite. Start with the essentials, learn what you use, and refine the system one practical trip at a time.
Shop this guide


Compare all 9 camp stoves and cooking sets →
Free shipping on all orders within the United States.